การแสดงผลเบื้งต้นของคลาส MaterialApp() ไม่มีการกำหนดค่าเริ่มต้นใดๆมาให้ ดังนั้นเราต้องกำหนดค่าเองเช่นสีพื้นหลัง สีตัวอักษรหรือตำแหน่งของวิดเจ็ตบนหน้าจอ
โดยการการหนดค่าต่างๆของหน้าจอสามารถทำได้ผ่านทางวิดเจ็ตหน้าหรือ scaffold() ซึ่งมี name arguments มากมายให้เราเซ็ตค่าของหน้าจอ เช่น appBar, backgroundColor, body เป็นต้น
ทุกครั้งที่เพิ่ม name argument ให้เราใส่เครื่องคอมมา , ต่อจากวงเล็บ (), ของ name argument แต่ละตัว เพื่อช่วยให้ Code จัดรูปแบบโปรแกรมให้อ่านง่ายโดยการกดคีย์ลัดจัดรูปแบบเอกสารคือ shift+option+f หรือ shift+alt+f
	  import 'package:flutter/material.dart';
	  void main() => runApp(MyApp());

	  class MyApp extends StatelessWidget {
		Widget build(BuildContext context) {
		  return MaterialApp(
			home: Scaffold(
			  appBar: AppBar(
				title: Text('My App Bar'),
			  ),
			  body: Text('My Body Text'),
			),
		  );
		}
	  }
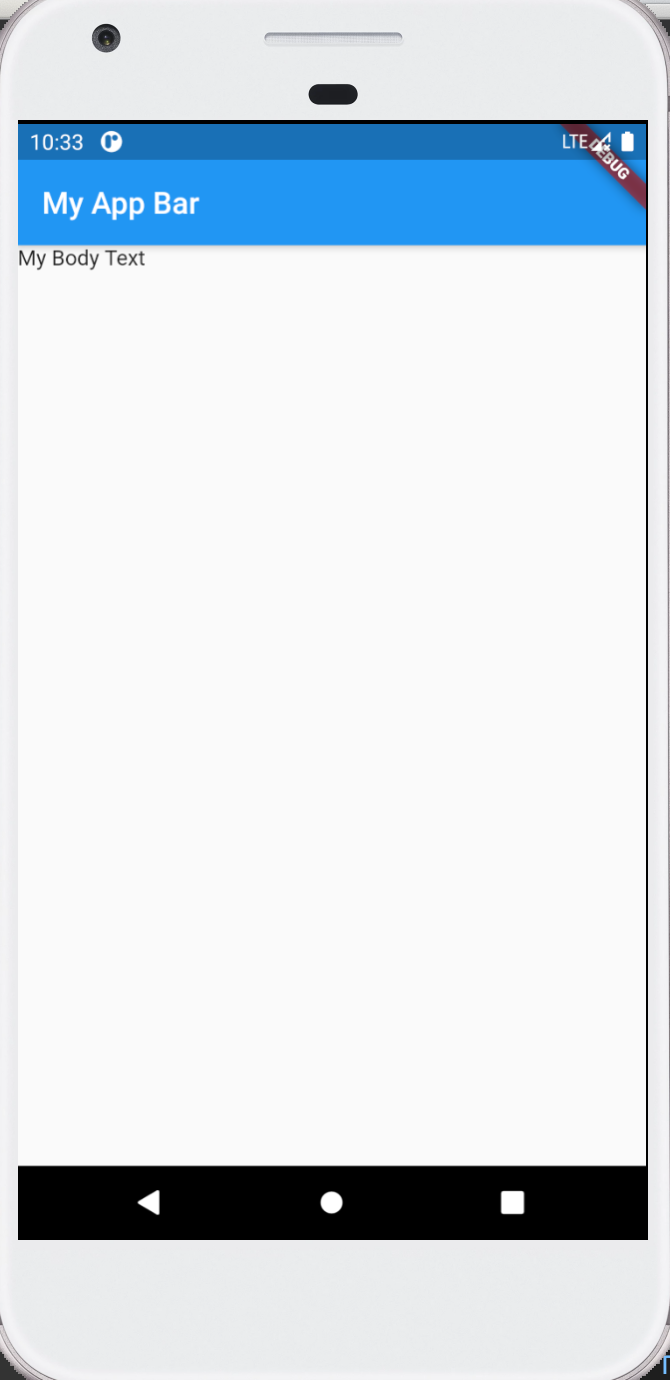
วิดเจ็ตที่ได้คือ scaffold ที่ประกอบด้วย appBar() ที่มีพารามิเตอร์เพียงตัวเดียวเป็นชนิดวิดเจ็ต (ให้วางเมาส์บนชื่อวิดเจ็ต Code จะแสดงรายละเอียดของวิดเจ็ตนั้นๆ) ให้เราใช้วิดเจ็ต default AppBar() มีข้อความ title เป็นวิดเจ็ต Text() ตัวอักษรสีขาวบนพื้นสีฟ้าและเว้นระยะจากขอบซ้ายของหน้าจอ
และใช้ name parameter ตัวที่สองของ scaffold เป็น body() ซึ่งมีพารามีเตอร์เป็นวิดเจ็ตเพียงตัวเดียวเหมือนกัน โดยเราสร้างวิดเจ็ต Text() ใน body() จะได้ข้อความตัวอักษรสีดำบนพื้นสีขาวไม่เว้นระยะจากขอบซ้ายของหน้าจอ
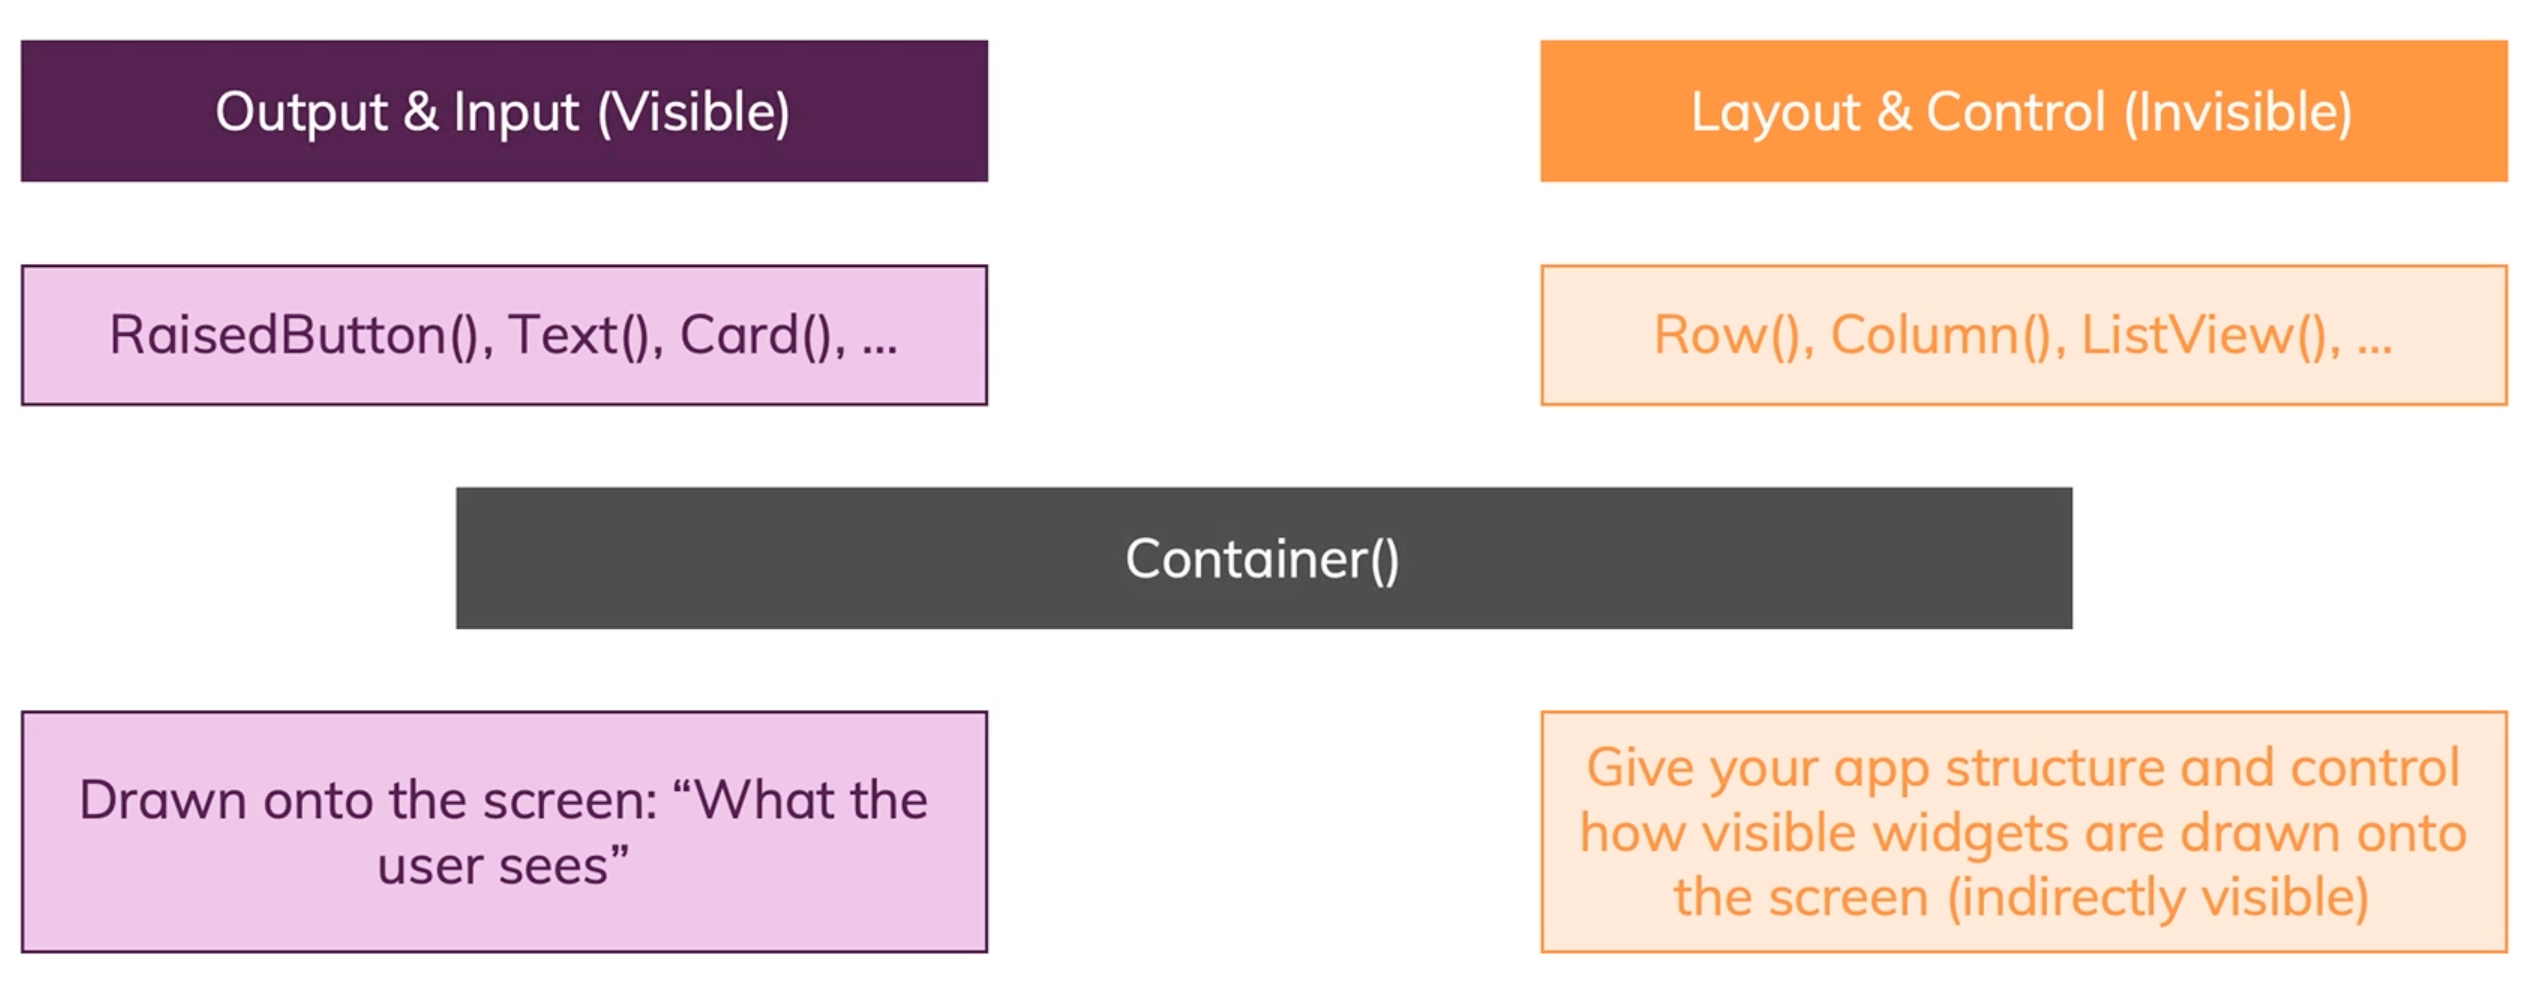
แอปนี้ปประกอบด้วยคำถามและคำตอบแสดงผลด้วยวิดเจ็ต Text() และวิดเจ็ต RaisedButton() เนื่องจากเราต้องจัดวางวิดเจ็ตในตำแหน่งที่กำหนด จึงต้องทำความเข้าใจกับ layout widget ซึ่งเป็นวิดเจ็ตที่มองไม่เห็น เข่น Row(), Column() ต่างจาก Text() และ RaisedButton() ที่มองเห็น นอกจากนั้นก็ยังมีวิดเจ็ต Containner() ซึ่งเป็นได้ทั้งวิดเจ็ตที่มองเห็นและมองไม่เห็น
ในการสร้างแอปถามตอบ เราจะจัดวางคำถาม คำตอบเป็นแถวๆด้วยวิดเจ็ต Column()
ภายใน Column() ก็ประกอบด้วยวิดเจ็ต Text() สำหรับคำถาม และปุ่มกดสำหรับคำตอบ
	  import 'package:flutter/material.dart';

	  void main() => runApp(MyApp());

	  class MyApp extends StatelessWidget {
		@override
		Widget build(BuildContext context) {
		  return MaterialApp(
			home: Scaffold(
			  appBar: AppBar(
				title: Text('My App Bar'),
			  ),
			  body: Column(
				children: [
				  Text('Questions'),
				  RaisedButton(
					child: Text('Answer 1'),
					onPressed: null,
				  ),
				  RaisedButton(
					child: Text('Answer 2'),
					onPressed: null,
				  ),
				  RaisedButton(
					child: Text('Answer 3'),
					onPressed: null,
				  ),
				  RaisedButton(
					child: Text('Answer 4'),
					onPressed: null,
				  ),
				],
			  ),
			),
		  );
		}
	  }
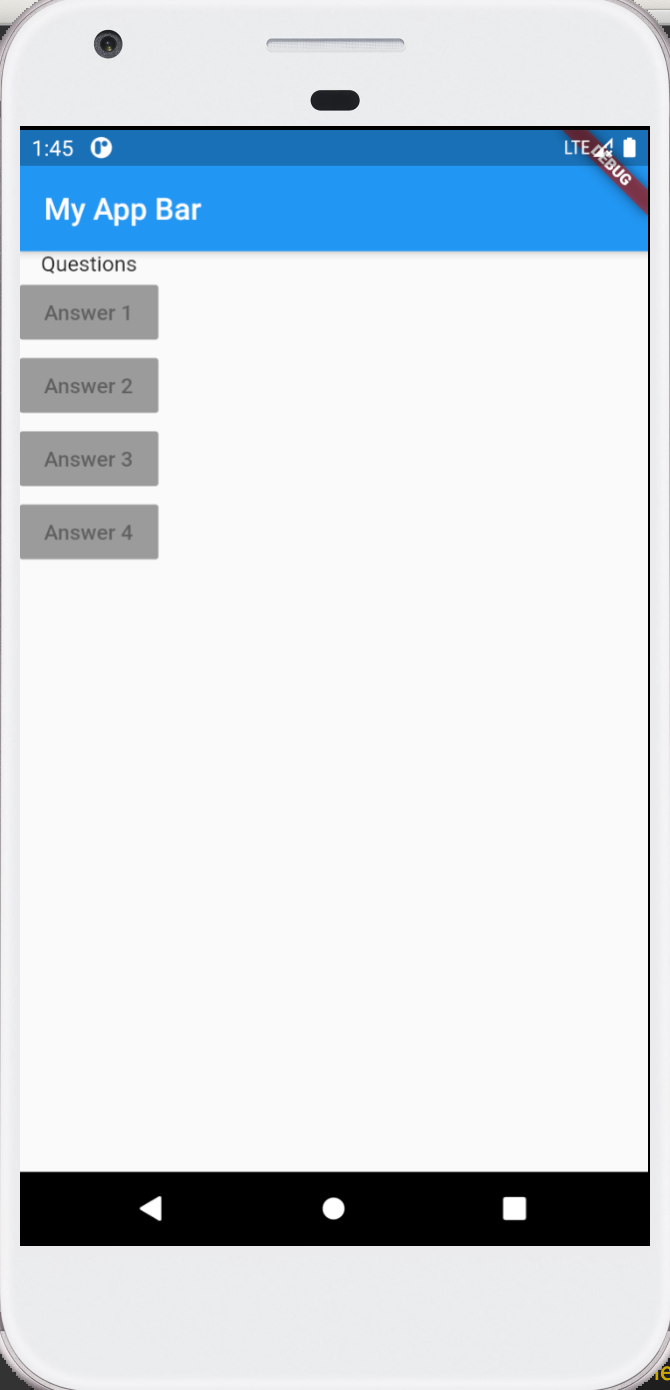
ถ้าเราใส่ , ต่อท้าย (), ของแต่ละพารามิเตอร์ เมื่อกดคีย์ลัดจัดรูปแบบเอกสาร Code จะจัดรูปแบบโปรแกรมให้ตามตัวอย่างด้านบน ซึ่งหน้าจอประกอบด้วย appBar(), และ Column() ที่มีพารามิเตอร์ Children[] ซึ่งเป็นลิสต์หรืออาร์เรย์ ที่เราใช้เก็บคำถาม Text() และปุ่มกดคำตอบ RaisedButton()
วิดเจ็ต RaisedButton() เราใช้ name parameter สองตัวคือ Child() ซึ่งแสดงคำตอบด้วย Text() และ onPressed ที่ชี้ไปยังฟังก์ชันที่กำหนดเมื่อกดปุ่ม โดยรูปแบบของฟังก์ชันคือไม่มีพารามีเตอร์และรีเทินชนิด void แต่ตอนนี้เรายังไม่ได้ผูกปุ่มกดกับฟังก์ชันใดๆ ก็ให้ใส่ค่า null ไปก่อน (null คือค่า value ที่ไม่มีค่าคือฟังก์ชัน null คล้ายๆกับ void คือชนิด type ที่ไม่มีชนิด)
รันโปรแกรม หน้าจอจะแสดง appBar(), Text(), และ RaisedButton()
สังเกตว่าปุ่ม RaisedButton() จะกดไม่ได้เพราะ onPressed เป็นค่า null
และปุ่ม RaisedButton() จะเรียงในรูปแบบคอลัมน์ ถ้าต้องการให้ปุ่มกดอยู่ในแถวเดียวกัน ก็ต้องใช้วิดเจ็ต Row() แทน Column()
สร้างฟังก์ชันในวิดเจ็ต MyApp() ตามรูปแบบของพารามิเตอร์ onPressed คือฟังก์ชันที่รีเทิน void และไม่มีพารามิเตอร์
	void answer() {
		print('Answer clicked!');
	}
จากนั้นก็ใส่ชือฟังก์ชันเป็นค่าของพารามิเตอร์ onPressed: answer โดยไม่ต้องใช้ () ต่อท้ายชื่อฟังก์ชันเพราะเราไม่ได้เรียกใช้ฟังชัน แต่เราส่งชื่อฟังก์ชันหรือตัวชี้ไปยังฟังก์ชัน เมื่อมีการกดปุ่ม
import 'package:flutter/material.dart';

void main() => runApp(MyApp());

class MyApp extends StatelessWidget {
  void answer() {
    print('Answer clicked!');
  }
  @override
  Widget build(BuildContext context) {
    return MaterialApp(
      home: Scaffold(
        appBar: AppBar(
          title: Text('My App Bar'),
        ),
        body: Column(
          children: [
            Text('Questions'),
            RaisedButton(
              child: Text('Answer 1'),
              onPressed: answer,
            ),
            RaisedButton(
              child: Text('Answer 2'),
              onPressed: answer,
            ),
            RaisedButton(
              child: Text('Answer 3'),
              onPressed: answer,
            ),
            RaisedButton(
              child: Text('Answer 4'),
              onPressed: answer,
            ),
          ],
        ),
      ),
    );
  }
}
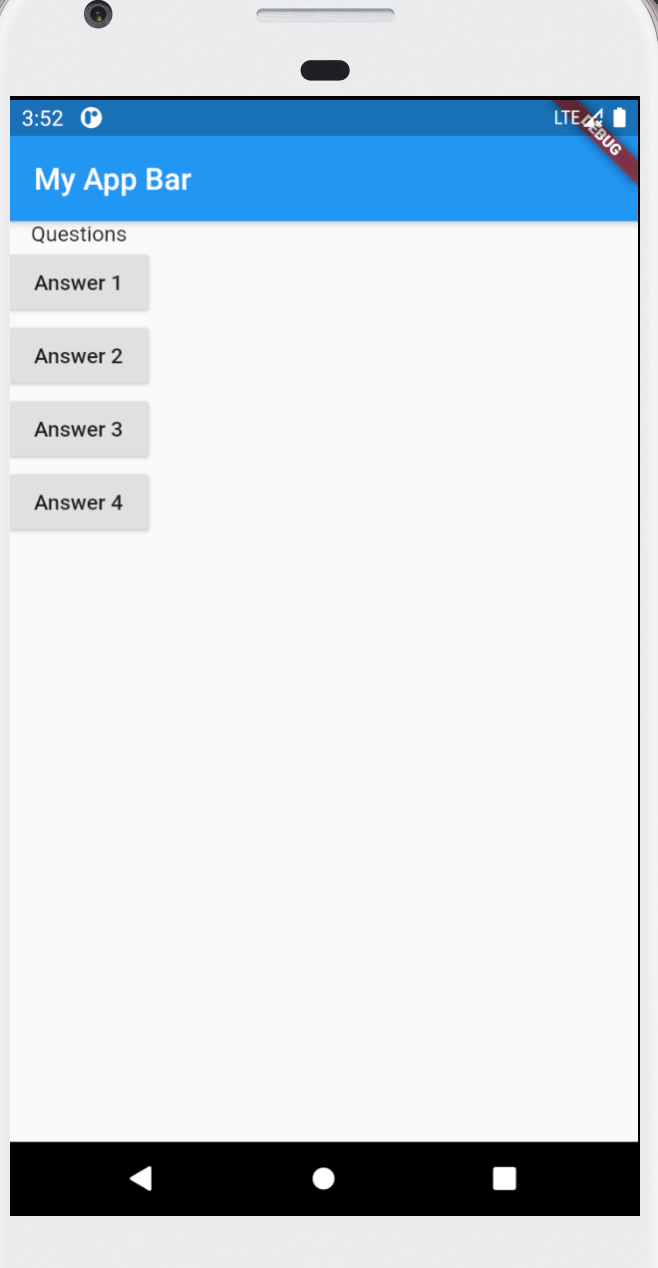
รันโปรแกรม ปุ่มกดทั้งสี่จะกดได้ และแสดงข้อความ Answer clicked!
ในการส่งพารามิเตอร์ที่เป็นฟังก์ชันไปยัง onPressed เราสามารถส่งได้หลายแบบ เช่นส่งชื่อฟังก์ชันตามตัวอย่างด้านบน หรือเราสามารถเขียนนิยามฟังก์ชันต่อจากเครื่องหหมาย : ของพารามิเตอร์เลยก็ได้ ซึ่งถ้าเราใช้วิธีนี้ก็ไม่ต้องบอกชื่อฟังก์ชัน แต่ให้เขียนฟังก์ชันตามรูปแบบคือฟังก์ชันที่ไม่มีพารามิเตอร์และรีเทิน void
ถ้าเราเขียนนิยามฟังก์ชันต์เป็นพารามิเตอร์แทนชื่อ ก็ไม่จำเป็นต้องใช้ชือฟังก์ชันอีกหรือเรียกว่าฟังก์ชันไม่มีชื่อ (anonymous function คล้ายๆกับ closure ของ swift) และถ้าฟังก์ชั้นนี้มีเพียงคำสั่งเดียว ก็สามารถเขียนเป็น shortcut function ก็ได้
	// normal function
	void answer() {
		print('Answer 1 clicked!');
	}
	onPressed: answer,
	// anonymous function
	onPressed: () {
		print('Answer 2 clicked!');
		print('other stuffs');
	}
	// shortcut function
	onPressed: () => print('Answer 3 clicked!');
พารามิเตอร์ทั้งสามรูปแบบในโปรแกรม
	import 'package:flutter/material.dart';

	void main() => runApp(MyApp());

	class MyApp extends StatelessWidget {
	  void answer() {
		print('Answer 1 clicked!');
	  }

	  @override
	  Widget build(BuildContext context) {
		return MaterialApp(
		  home: Scaffold(
			appBar: AppBar(
			  title: Text('My App Bar'),
			),
			body: Column(
			  children: [
				Text('Questions'),
				RaisedButton(
				  child: Text('Answer 1'),
				  onPressed: answer,
				),
				RaisedButton(
				  child: Text('Answer 2'),
				  onPressed: () {
					print('Answer 2 clicked!');
					print('other stuffs');
				  },
				),
				RaisedButton(
					child: Text('Answer 3'),
					onPressed: () => print('Answer 3 clicked!')),
				RaisedButton(
					child: Text('Answer 4'),
					onPressed: () => print('Answer 4 clicked!')),
			  ],
			),
		  ),
		);
	  }
	}
	ผลลัพธ์จากคอนโซลเมื่อกดปุ่มทั้งสี่ปุ่ม
	I/flutter (17865): Answer 1 clicked!
	I/flutter (17865): Answer 2 clicked!
	I/flutter (17865): other stuffs
	I/flutter (17865): Answer 3 clicked!
	I/flutter (17865): Answer 4 clicked!
ให้เราสร้างรายการคำถามด้วยลิสต์หรืออาร์เรย์ของสตริง และเปลี่ยนเป็นคำถามถัดไปเมื่อกดปุ่มคำตอบ ที่ผ่านมาเมื่อเรากดปุ่ม เราให้แสดงข้อความในหน้าจอคอนโซล ถ้าต้องการให้แสดงผลลัพธ์บนวิดเจ็ตหน้าจอ ต้องทำอย่างไรบ้าง อันดับแรก สร้างรายการคำถามด้วยลิสต์
var questions = [
      'คุณชอบสีอะไร',
      'สัตว์เลี้ยงที่ชื่นชอบคือออะไร',
      'ชอบอาหารอะไรที่สุด',
      'ภาษาคอมที่ชื่นชอบคืออะไร'
];
เปลี่ยนข้อความคำถามในวิดเจ็ต Text() ให้เป็นรายการที่มาจากลิสต์ โดยใช้ [] อ้างอิงรายการจากลิสต์
body: Column(
    children: [
        Text(questions[0]),
        RaisedButton(
            child: Text('Answer 1'),
            onPressed: answer,
        ),
		...
เปลี่ยนเป็นคำถามถัดไป เมื่อกดคำตอบ ในกรณีนี้เราต้องสร้างตัวแปรในคลาสเพื่อเก็บหมายเลขคำถาม และเพิ่มค่าทีละหนึ่งเมื่อกดปุ่มคำตอบในเมธอด answer()
	class MyApp extends StatelessWidget {
		var questionId = 0;
		void answer() {
		  questionId += 1;
		}
		@override
		Widget build(BuildContext context) {
		  var questions = [
				...
body: Column(
          children: [
            Text(questions[questionId]),
            RaisedButton(
              child: Text('Answer 1'),
              onPressed: answer,
            ),
			...
โปรแกรมทั้งหมด
import 'package:flutter/material.dart';

void main() => runApp(MyApp());

class MyApp extends StatelessWidget {
  var questionId = 0;
  void answer() {
    questionId += 1;
    print(questionId);
  }

  @override
  Widget build(BuildContext context) {
    var questions = [
      'คุณชอบสีอะไร',
      'สัตว์เลี้ยงที่ชื่นชอบคือออะไร',
      'ชอบอาหารอะไรที่สุด',
      'ภาษาคอมที่ชื่นชอบคืออะไร'
    ];
    return MaterialApp(
      home: Scaffold(
        appBar: AppBar(
          title: Text('My App Bar'),
        ),
        body: Column(
          children: [
            Text(questions[questionId]),
            RaisedButton(
              child: Text('Answer 1'),
              onPressed: answer,
            ),
            RaisedButton(
              child: Text('Answer 2'),
              onPressed: () {
                questionId += 1;
              },
            ),
            RaisedButton(
                child: Text('Answer 3'), onPressed: () => questionId += 1),
            RaisedButton(
                child: Text('Answer 4'), onPressed: () => questionId += 1),
          ],
        ),
      ),
    );
  }
}
กดปุ่มรันโปรแกรม กดปุ่ม Answer 1 หลายๆครั้ง 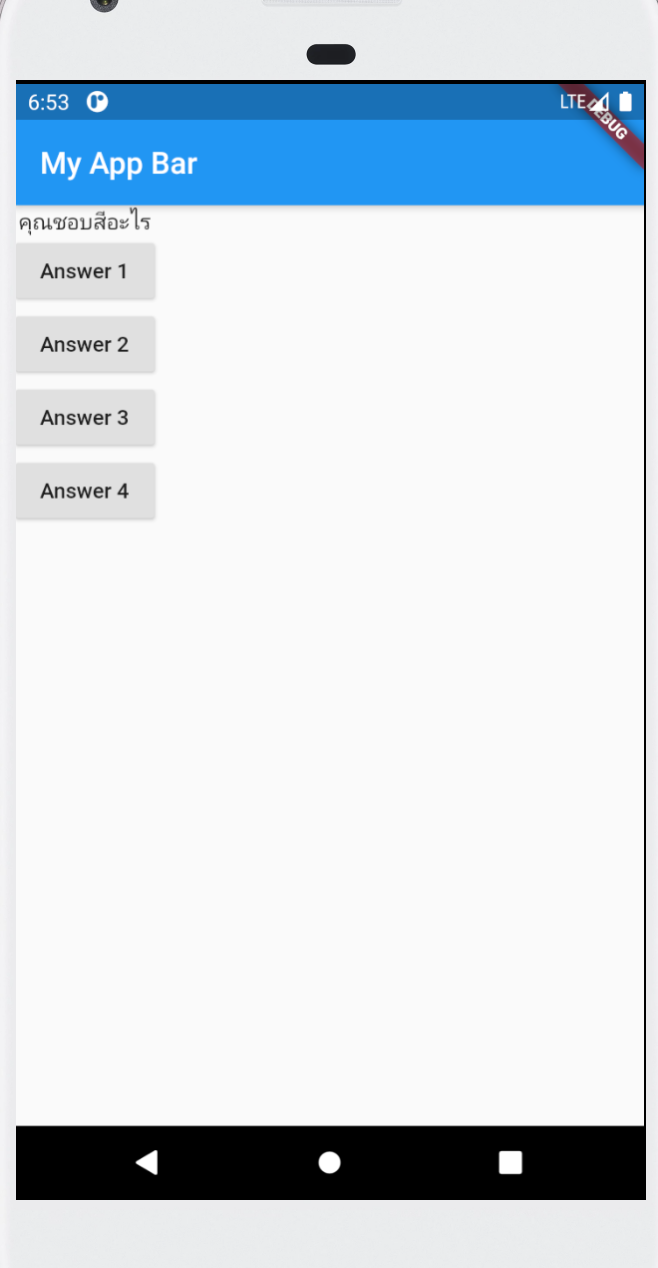
I/flutter (20910): 1
I/flutter (20910): 2
I/flutter (20910): 3
I/flutter (20910): 4
จะเห็นว่าหมายเลขคำถามเปลี่ยน แต่ข้อความคำถามไม่เปลี่ยน ทำไม เพราะอะไร
2020. mnet50.com